OpenAuth with SST and Next.js
We are going to create a new Next.js app, add authentication to it with OpenAuth, and deploy it with OpenNext and SST.
Before you get started, make sure to configure your AWS credentials.
Examples
We also have another OpenAuth example that you can refer to.
1. Create a project
Let’s start by creating our Next.js app and starting it in dev mode.
npx create-next-app@latest aws-auth-nextjscd aws-auth-nextjsWe are picking TypeScript and not selecting ESLint.
Init SST
Now let’s initialize SST in our app.
npx sst@latest initSelect the defaults and pick AWS. This’ll create a sst.config.ts file in your project root.
2. Add OpenAuth server
Next, let’s add a directory for our OpenAuth server.
mkdir authAdd our OpenAuth server to a auth/index.ts file.
import { handle } from "hono/aws-lambda";import { issuer } from "@openauthjs/openauth";import { CodeUI } from "@openauthjs/openauth/ui/code";import { CodeProvider } from "@openauthjs/openauth/provider/code";import { subjects } from "./subjects";
async function getUser(email: string) {  // Get user from database and return user ID  return "123";}
const app = issuer({  subjects,  // Remove after setting custom domain  allow: async () => true,  providers: {    code: CodeProvider(      CodeUI({        sendCode: async (email, code) => {          console.log(email, code);        },      }),    ),  },  success: async (ctx, value) => {    if (value.provider === "code") {      return ctx.subject("user", {        id: await getUser(value.claims.email),      });    }    throw new Error("Invalid provider");  },});
export const handler = handle(app);
Define subjects
We are also going to define our subjects. Add the following to a auth/subjects.ts file.
import { object, string } from "valibot";import { createSubjects } from "@openauthjs/openauth/subject";
export const subjects = createSubjects({  user: object({    id: string(),  }),});
Let’s install our dependencies.
npm install @openauthjs/openauth valibot honoAdd Auth component
Now let’s add this to our SST app. Replace the run function in sst.config.ts with the following.
const auth = new sst.aws.Auth("MyAuth", {  issuer: "auth/index.handler",});
new sst.aws.Nextjs("MyWeb", {  link: [auth],});
This is defining our OpenAuth component and linking it to our Next.js app.
Start dev mode
Run the following to start dev mode. This’ll start SST, your Next.js app, and your OpenAuth server.
npx sst devOnce complete, it should give you the URL of your OpenAuth server.
✓ Complete MyAuth: https://fv62a3niazbkrazxheevotace40affnk.lambda-url.us-east-1.on.awsAlso click on MyWeb in the sidebar and open your Next.js app by going to http://localhost:3000.
3. Add OpenAuth client
Next, let’s add our OpenAuth client to our Next.js app. Add the following to app/auth.ts.
import { Resource } from "sst";import { createClient } from "@openauthjs/openauth/client";import { cookies as getCookies } from "next/headers";
export const client = createClient({  clientID: "nextjs",  issuer: Resource.MyAuth.url,});
export async function setTokens(access: string, refresh: string) {  const cookies = await getCookies();
  cookies.set({    name: "access_token",    value: access,    httpOnly: true,    sameSite: "lax",    path: "/",    maxAge: 34560000,  });  cookies.set({    name: "refresh_token",    value: refresh,    httpOnly: true,    sameSite: "lax",    path: "/",    maxAge: 34560000,  });}
Here we are linking to our auth server. And once the user is authenticated, we’ll be saving their access and refresh tokens in http only cookies.
Add auth actions
Let’s add the server actions that our Next.js app will need to authenticate users. Add the following to app/actions.ts.
"use server";
import { redirect } from "next/navigation";import { headers as getHeaders, cookies as getCookies } from "next/headers";import { subjects } from "../auth/subjects";import { client, setTokens } from "./auth";
export async function auth() {  const cookies = await getCookies();  const accessToken = cookies.get("access_token");  const refreshToken = cookies.get("refresh_token");
  if (!accessToken) {    return false;  }
  const verified = await client.verify(subjects, accessToken.value, {    refresh: refreshToken?.value,  });
  if (verified.err) {    return false;  }  if (verified.tokens) {    await setTokens(verified.tokens.access, verified.tokens.refresh);  }
  return verified.subject;}
export async function login() {  const cookies = await getCookies();  const accessToken = cookies.get("access_token");  const refreshToken = cookies.get("refresh_token");
  if (accessToken) {    const verified = await client.verify(subjects, accessToken.value, {      refresh: refreshToken?.value,    });    if (!verified.err && verified.tokens) {      await setTokens(verified.tokens.access, verified.tokens.refresh);      redirect("/");    }  }
  const headers = await getHeaders();  const host = headers.get("host");  const protocol = host?.includes("localhost") ? "http" : "https";  const { url } = await client.authorize(    `${protocol}://${host}/api/callback`,    "code",  );  redirect(url);}
export async function logout() {  const cookies = await getCookies();  cookies.delete("access_token");  cookies.delete("refresh_token");
  redirect("/");}
This is adding an auth action that checks if a user is authenticated, login that starts the OAuth flow, and logout that clears the session.
Add callback route
When the OpenAuth flow is complete, users will be redirected back to our Next.js app. Let’s add a callback route to handle this in app/api/callback/route.ts.
import { client, setTokens } from "../../auth";import { type NextRequest, NextResponse } from "next/server";
export async function GET(req: NextRequest) {  const url = new URL(req.url);  const code = url.searchParams.get("code");
  const exchanged = await client.exchange(code!, `${url.origin}/api/callback`);
  if (exchanged.err) return NextResponse.json(exchanged.err, { status: 400 });
  await setTokens(exchanged.tokens.access, exchanged.tokens.refresh);
  return NextResponse.redirect(`${url.origin}/`);}
Once the user is authenticated, we redirect them to the root of our app.
4. Add auth to app
Now we are ready to add authentication to our app. Replace the <Home /> component in app/page.tsx with the following.
import { auth, login, logout } from "./actions";
export default async function Home() {  const subject = await auth();
  return (    <div className={styles.page}>      <main className={styles.main}>        <Image          className={styles.logo}          src="/next.svg"          alt="Next.js logo"          width={180}          height={38}          priority        />        <ol>          {subject ? (            <>              <li>                Logged in as <code>{subject.properties.id}</code>.              </li>              <li>                And then check out <code>app/page.tsx</code>.              </li>            </>          ) : (            <>              <li>Login with your email and password.</li>              <li>                And then check out <code>app/page.tsx</code>.              </li>            </>          )}        </ol>
        <div className={styles.ctas}>          {subject ? (            <form action={logout}>              <button className={styles.secondary}>Logout</button>            </form>          ) : (            <form action={login}>              <button className={styles.primary}>Login with OpenAuth</button>            </form>          )}        </div>      </main>    </div>  );}
Let’s also add these styles to app/page.module.css.
.ctas button {  appearance: none;  background: transparent;  border-radius: 128px;  height: 48px;  padding: 0 20px;  border: none;  border: 1px solid transparent;  transition:    background 0.2s,    color 0.2s,    border-color 0.2s;  cursor: pointer;  display: flex;  align-items: center;  justify-content: center;  font-size: 16px;  line-height: 20px;  font-weight: 500;}
button.primary {  background: var(--foreground);  color: var(--background);  gap: 8px;}
button.secondary {  border-color: var(--gray-alpha-200);  min-width: 180px;}
Test your app
Head to http://localhost:3000 and click the login button, you should be redirected to the OpenAuth server asking you to put in your email.
If you check the Functions tab in your sst dev session, you’ll see the code being console logged. You can use this code to login.
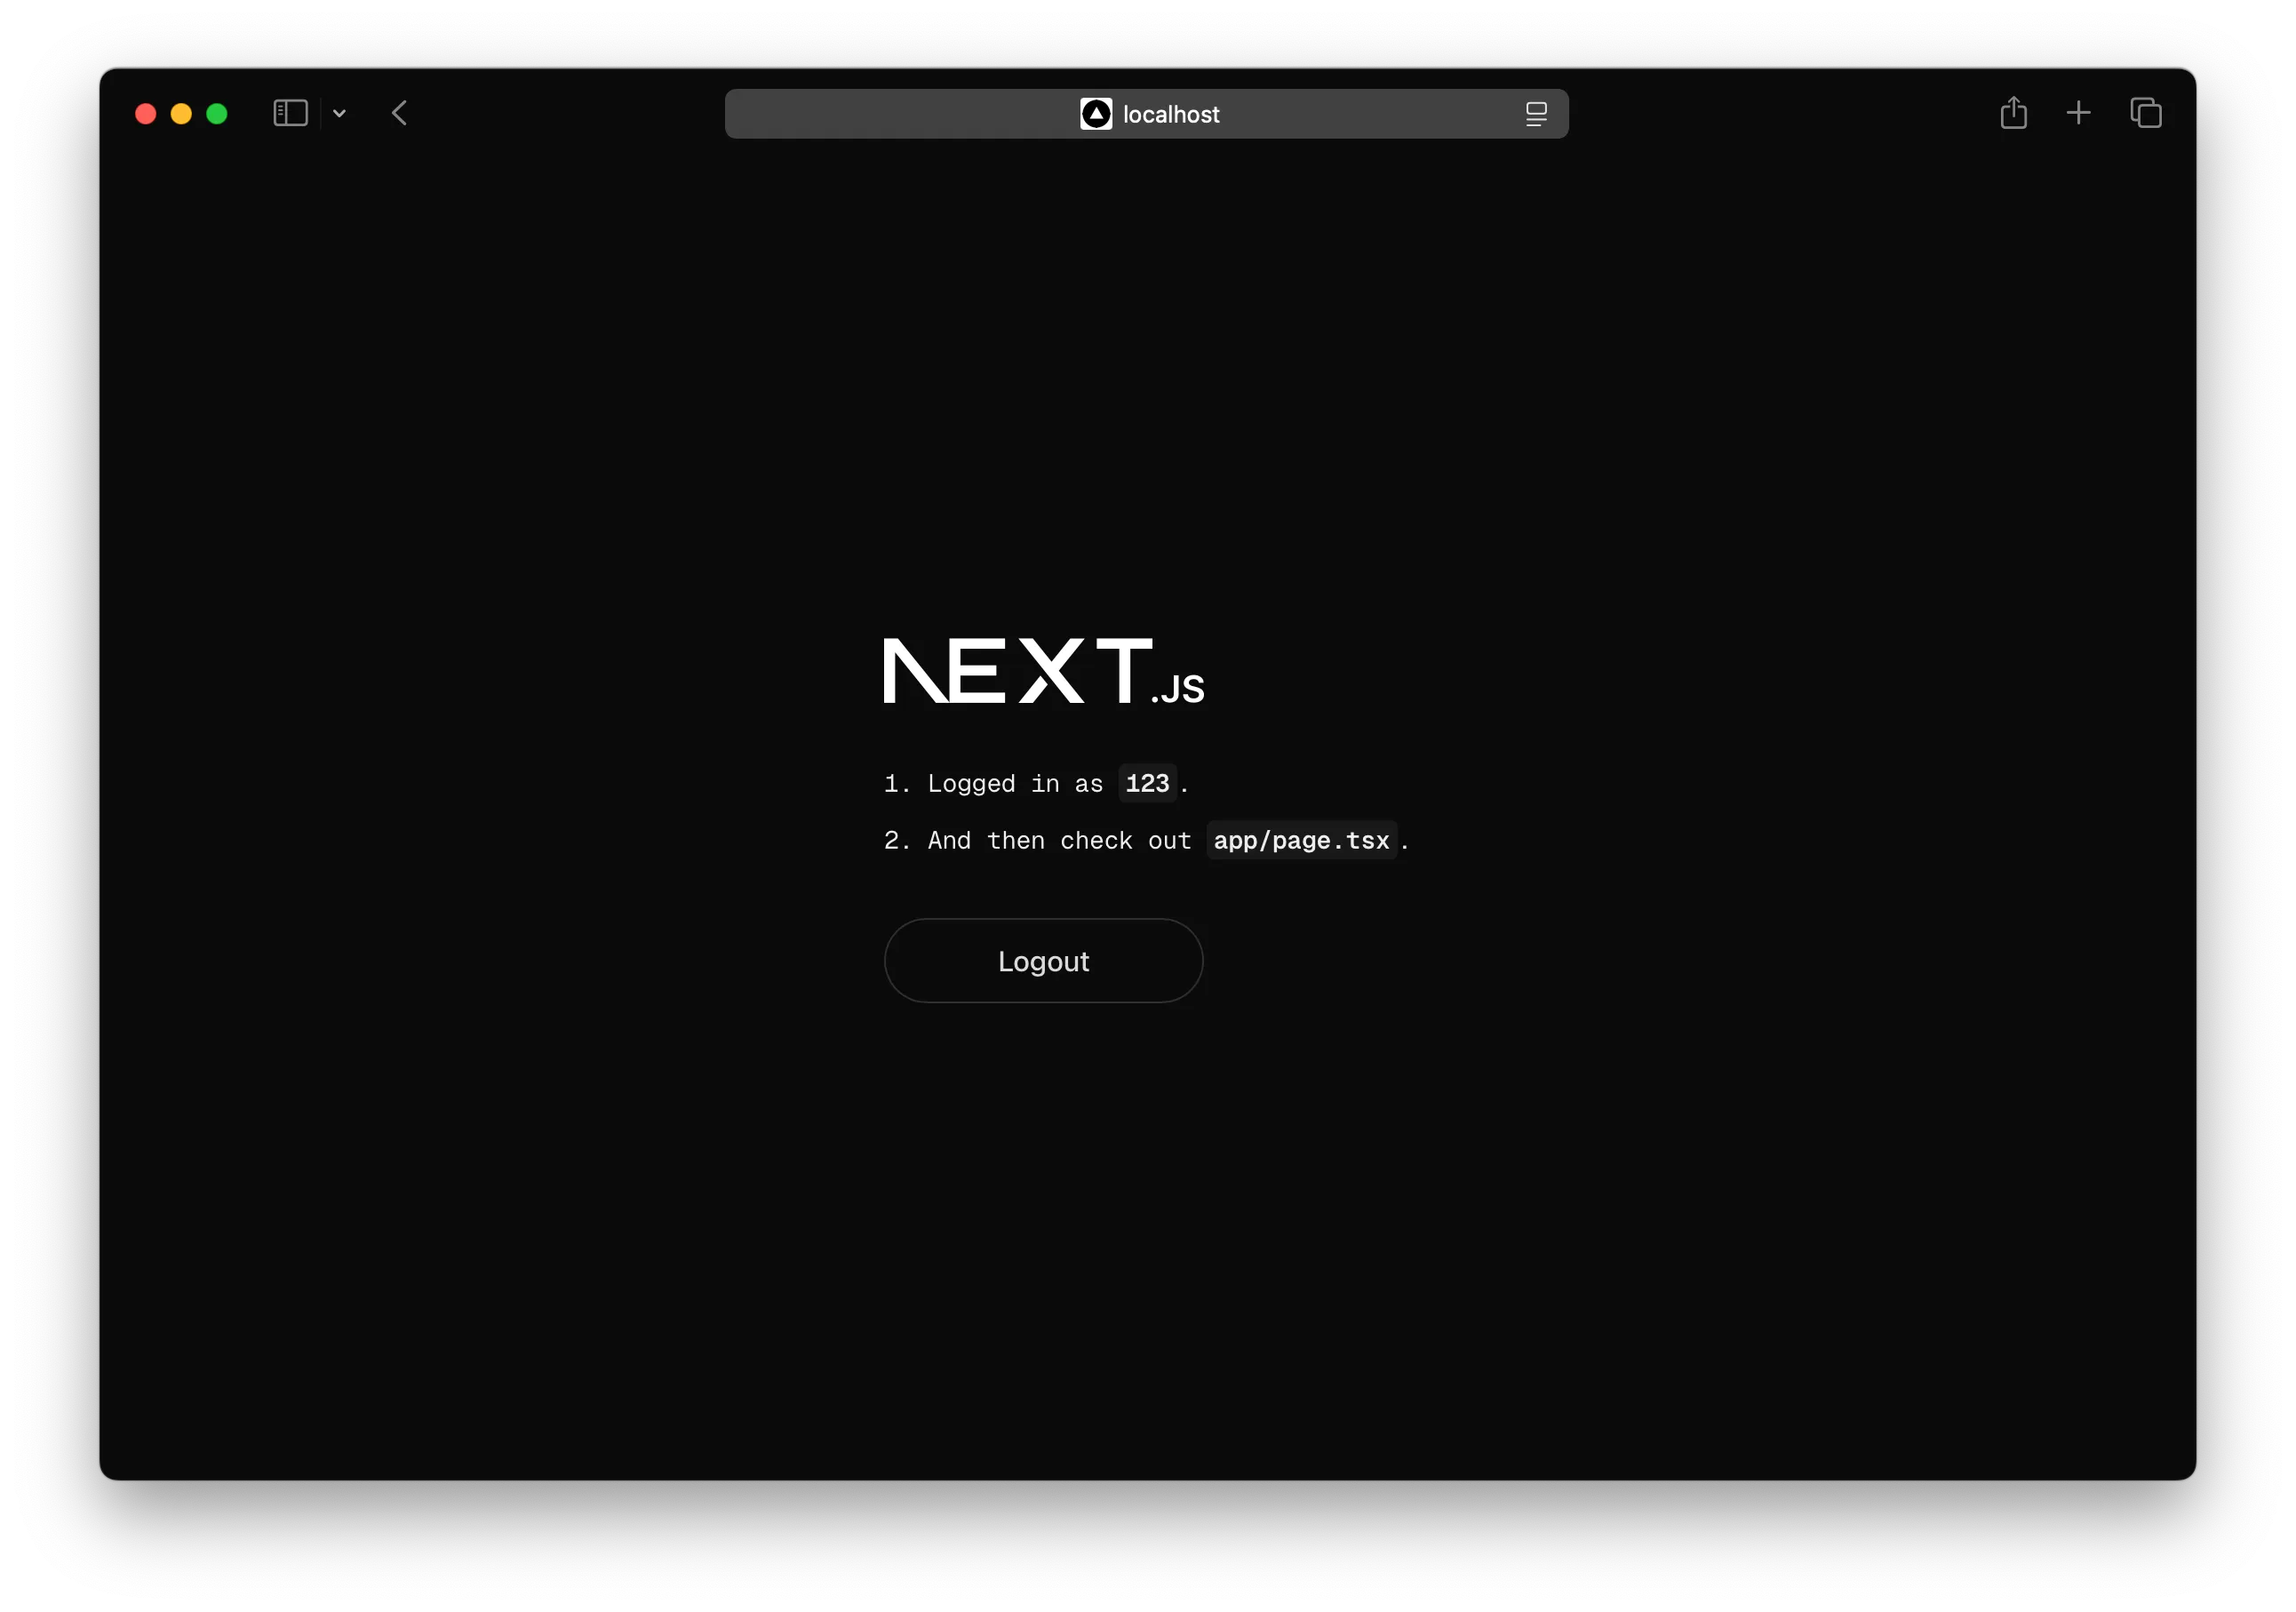
This should log you in and print your user ID.
5. Deploy your app
Now let’s deploy your app to AWS.
npx sst deploy --stage productionYou can use any stage name here but it’s good to create a new stage for production.
✓ Complete MyAuth: https://vp3honbl3od4gmo7mei37mchky0waxew.lambda-url.us-east-1.on.aws MyWeb: https://d2fjg1rqbqi95t.cloudfront.netCongrats! Your app and your OpenAuth server should now be live!
Connect the console
As a next step, you can setup the SST Console to git push to deploy your app and view logs from it.
You can create a free account and connect it to your AWS account.