


How to add Twitter authentication to a serverless API
In this example we will look at how to add Twitter authentication to a serverless API using SST.
Requirements
- Node.js 16 or later
- We’ll be using TypeScript
- An AWS account with the AWS CLI configured locally
- A Twitter app
Create an SST app
 Let’s start by creating an SST app.
$ npx create-sst@latest --template=base/example api-auth-twitter
$ cd api-auth-twitter
$ npm install
By default, our app will be deployed to an environment (or stage) called dev and the us-east-1 AWS region. This can be changed in the json in your project root.
import { SSTConfig } from "sst";
import { Api } from "sst/constructs";

export default {
  config(_input) {
    return {
      name: "api-auth-twitter",
      region: "us-east-1",
    };
  },
} satisfies SSTConfig;
Project layout
An SST app is made up of two parts.
-
stacks/— App InfrastructureThe code that describes the infrastructure of your serverless app is placed in the
stacks/directory of your project. SST uses AWS CDK, to create the infrastructure. -
packages/functions/— App CodeThe code that’s run when your API is invoked is placed in the
packages/functions/directory of your project.
Setting up the API
Let’s start by setting up an API.
Replace the stacks/ExampleStack.ts with the following.
import { Api, Cognito, StackContext } from "sst/constructs";

export function ExampleStack({ stack }: StackContext) {
  // Create Api
  const api = new Api(stack, "Api", {
    defaults: {
      authorizer: "iam",
    },
    routes: {
      "GET /private": "packages/functions/src/private.main",
      "GET /public": {
        function: "packages/functions/src/public.main",
        authorizer: "iam",
      },
    },
  });

  // Show the API endpoint and other info in the output
  stack.addOutputs({
    ApiEndpoint: api.url,
  });
}
We are creating an API here using the Api construct. And we are adding two routes to it.
GET /private
GET /public
To secure our APIs we are adding the authorization type AWS_IAM. This means the caller of the API needs to have the right permissions. The first route is a private endpoint. The second is a public endpoint and its authorization type is overriden to NONE.
Setting up authentication
Now let’s add authentication for our serverless app.
Add this below the Api definition in stacks/ExampleStack.ts. Make sure to replace the consumerKey and consumerSecret with that of your Twitter app.
// Create auth provider
const auth = new Cognito(stack, "Auth", {
  identityPoolFederation: {
    twitter: {
      consumerKey: "gyMbPOiwefr6x63SjIW8NN0d1",
      consumerSecret: "qxld8zic5c2eyahqK3gjGLGQaOTogGfAgHh17MYOIcOUR9l2Nz",
    },
  },
});

// Allow authenticated users invoke API
auth.attachPermissionsForAuthUsers(stack, [api]);
This creates a Cognito Identity Pool which relies on Google to authenticate users. And we use the attachPermissionsForAuthUsers method to allow our logged in users to access our API.
Replace the stack.addOutputs call with the following.
stack.addOutputs({
  ApiEndpoint: api.url,
  IdentityPoolId: auth.cognitoIdentityPoolId,
});
We are going to print out the resources that we created for reference.
Adding function code
Let’s create two functions, one handling the public route, and the other for the private route.
Add a packages/functions/src/public.ts.
export async function main() {
  return {
    statusCode: 200,
    body: "Hello stranger!",
  };
}
Add a packages/functions/src/private.ts.
export async function main() {
  return {
    statusCode: 200,
    body: "Hello user!",
  };
}
Now let’s test our new API.
Starting your dev environment
SST features a Live Lambda Development environment that allows you to work on your serverless apps live.
$ npm run dev
The first time you run this command it’ll take a couple of minutes to do the following:
- It’ll bootstrap your AWS environment to use CDK.
- Deploy a debug stack to power the Live Lambda Development environment.
- Deploy your app, but replace the functions in the
packages/functions/directory with ones that connect to your local client. - Start up a local client.
Once complete, you should see something like this.
===============
 Deploying app
===============

Preparing your SST app
Transpiling source
Linting source
Deploying stacks
dev-api-auth-twitter-ExampleStack: deploying...

 ✅  dev-api-auth-twitter-ExampleStack


Stack dev-api-auth-twitter-ExampleStack
  Status: deployed
  Outputs:
    ApiEndpoint: https://b3njix6irk.execute-api.us-east-1.amazonaws.com
    IdentityPoolId: us-east-1:abc36c64-36d5-4298-891c-7aa9ea318f1d
The ApiEndpoint is the API we just created. Make a note of the IdentityPoolId, we’ll need that later.
Now let’s try out our public route. Head over to the following in your browser. Make sure to replace the URL with your API.
https://b3njix6irk.execute-api.us-east-1.amazonaws.com/public
You should see the greeting Hello stranger!.
And if you try to visit the private route, you will see {"message":"Forbidden"}.
https://b3njix6irk.execute-api.us-east-1.amazonaws.com/private
Login with Twitter
We are going to use the twurl tool to test logging in with Twitter. Follow the project README to install twurl.
Once installed, we’ll need to set our app credentials. Run the following and replace it with those from your Twitter app.
$ twurl authorize --consumer-key gyMbPOiwefr6x63SjIW8NN0d1 \
  --consumer-secret qxld8zic5c2eyahqK3gjGLGQaOTogGfAgHh17MYOIcOUR9l2Nz
This will return an authentication URL.
https://api.twitter.com/oauth/authorize?oauth_consumer_key=gyMbPOiwefr6x63SjIW8NN0d1&oauth_nonce=ELNkf9FaDqzNhLkxeuxFlnlDjwvQ17WBLlabN1Sg&oauth_signature=i%252By%252BuupyXcYAENs1XbL3zjb6CBY%253D&oauth_signature_method=HMAC-SHA1&oauth_timestamp=1612769097&oauth_token=PAXt3wAAAAABMhofAAABd4CHeJY&oauth_version=1.0 and paste in the supplied PIN
Open the URL in your browser. Authenticate to Twitter, and then enter the PIN back into the terminal. If you’ve authenticated successfully, you should get the message.
Authorization successful
Twurl stores your access token information in the ~/.twurlrc file. Note the token and secret in your profile.
---
profiles:
  fanjiewang:
    gyMbPOiwefr6x63SjIW8NN0d1:
      username: fanjiewang
      consumer_key: gyMbPOiwefr6x63SjIW8NN0d1
      consumer_secret: qxld8zic5c2eyahqK3gjGLGQaOTogGfAgHh17MYOIcOUR9l2Nz
      token: 29528254-ULNl2qISn2wEtmHUj1VJ4ZhQrNezi2SH2MP4b8lSV
      secret: v769kfAoC3UJG28DXBDE8N1bMjx6ZRuKUUTtkaek1m8qq
configuration:
  default_profile:
  - fanjiewang
  - gyMbPOiwefr6x63SjIW8NN0d1
Next, we need to get the user’s Cognito Identity id. Replace --identity-pool-id with the IdentityPoolId from the sst dev log output; and replace the --logins with the TOKEN and SECRET from the previous step.
$ aws cognito-identity get-id \
  --identity-pool-id us-east-1:abc36c64-36d5-4298-891c-7aa9ea318f1d \
  --logins api.twitter.com="TOKEN:SECRET"
You should get an identity id for the Twitter user.
{
  "IdentityId": "us-east-1:0a6b1bb0-614c-4e00-9028-146854eaee4a"
}
Now we’ll need to get the IAM credentials for the identity user.
$ aws cognito-identity get-credentials-for-identity \
  --identity-id us-east-1:0a6b1bb0-614c-4e00-9028-146854eaee4a \
  --logins graph.facebook.com="EAAF9u0npLFUBAGv7SlHXIMigP0nZBF2LxZA5ZCe3NqZB6Wc6xbWxwHqn64T5QLEsjOZAFhZCLJj1yIsDLPCc9L3TRWZC3SvKf2D1vEZC3FISPWENQ9S5BZA94zxtn6HWQFD8QLMvjt83qOGHeQKZAAtJRgHeuzmd2oGn3jbZBmfYl2rhg3dpEnFhkAmK3lC7BZAEyc0ZD"
This should give you a set of temporary IAM credentials.
{
  "IdentityId": "us-east-1:0a6b1bb0-614c-4e00-9028-146854eaee4a",
  "Credentials": {
    "AccessKeyId": "ASIARUIS6Q2MF3FI5XCV",
    "SecretKey": "3znZKINfXmEv9y3UC1MASUkJkhw/AVV+9Ny88qua",
    "SessionToken": "IQoJb3JpZ2luX2VjEHgaCXVzLWVhc3QtMSJHMEUCIQDNFismZshPFba10yJTB7hiX1S0qzPRGM0yb09hL+lOHgIgHuX2SBa75YbF/iyRoPEUyP+3gpkKAek6Mv/d35nuFBEqmAQIcRACGgwxMTIyNDU3Njk4ODAiDOHVJcoQ5KUmpbzzgSr1A7xg1HzbehJ/rejQkuaoWyiyVSecrPgBkLN01/jxief7/zoViKUdaocZrUNOcFXm9PtKKgEbEg16gUfTtaid6nhVE6MthX82f8oBArIancEgi5uj5KW9H2HOUjlmAmpcaooDeyDmTjtTwlKPpsWjz2B5NCDfQCrBVBQlv5st/sPSA88jkG1PYuQSmsueqiWeqVViDjaPaxNcVuuHgQofbPhSI0fUduXM9ePDP5O5rGNMo/g0oOLeyhgzJX/Xzf1qYx1BURILfKH10cx4PaCO5Zr49NggdfXAdooqZPqlAYAvDOA8FafiE7k2aG0pEC84yhiWl4BzHkAUGiMYjJD2eua7QMvfWHu1o/DIFH4jFzPjqKWV00CVCjyI8aFbmkarvdVkK+jqCfWYXYdD5HJSTwsjvmPhdF/3B7WWYTqb5eQPWVcPCbzj1WPGpKX0zbytKg4Z+Klb+Wp0yHG2QZ8blMHir6WgNoDJ/PisO6HbbpxqkWe+1GMkxi29IhjRZ18tAtpCwZRarIeEYfgPiHtt+QVAKg5T84Qprcslr6T6wkyNB8dqlVf4ozLekF/RbfAGq/BVbQy8iM62hU30SCoJrqyC6dq3xhcpiSv+kyKi0Q0NaT6rZ9w/oeQ+0olkrJRec1eVDeCmvw2O0eKXPsTEQoiFEGpIeTCc2YOBBjqEAqxGdKjVZWrMzG2yBIK55A9yqluEAyp3nnXPbnpU6VaKnCeVt16TR4sbD8/Y4HFZCW/zGo0K3ymQI+lfzpquaR9NdGnjjuiTcGqJRcaj94N/Aop/jGDXoBUnjqTelj7lkZtPO0sQ7Xf+NlVhzbPulMbnkIBe9f9FXnC2xpxGyfcWQOwoenqXRuXLzMQYGzVH9+ApEkzSVH0bqPZFqXm4cOFTw648Y41MrIE6EuXAorrJd/CfyvmWVd6WzMSplIG8UfNIDO1mS81D2Xg/O1urH8Bu0h6LsPjg1d3KLo9Cdd48+kNNcqqXkg2d+lSJA68Cxq3ne8N3jNnsxWDfBSj27hm9D2r0",
    "Expiration": "2021-02-08T03:47:40-05:00"
  }
}
Let’s make a call to the private route using the credentials. The API request needs to be signed with AWS SigV4. We are going to use Insomnia to help us sign and make this request.
Make sure to replace the Access Key Id, Secret Access Key, Region, and Session Token below. In our case the region is us-east-1. You can see this in the API URL.
https://b3njix6irk.execute-api.us-east-1.amazonaws.com
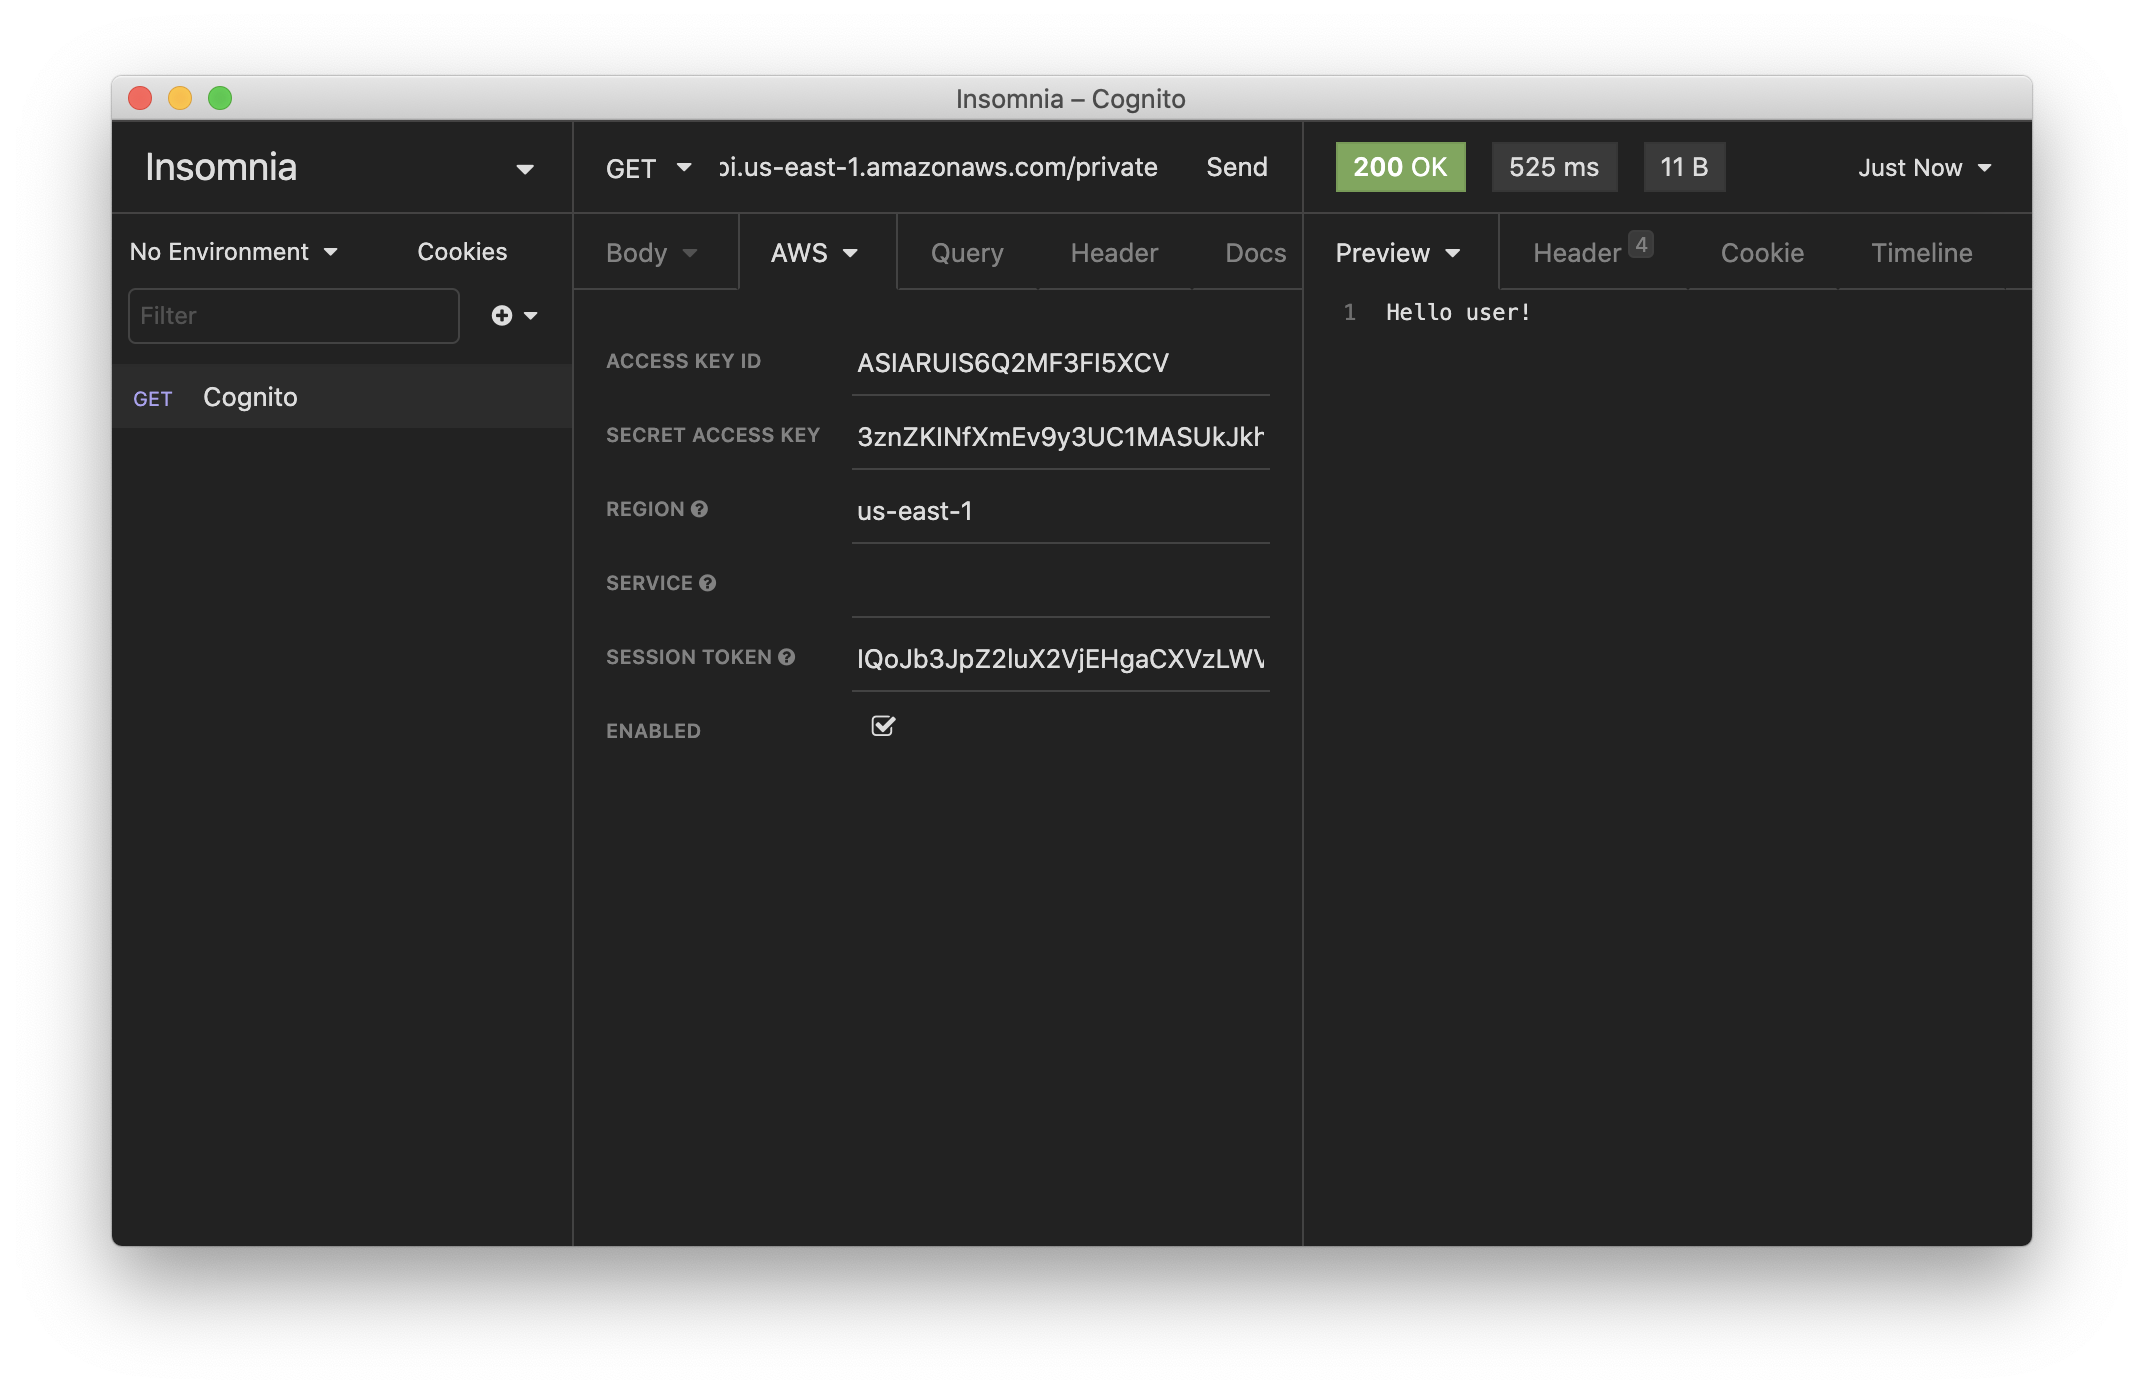
You should now see.
Hello user!
The above process might seem fairly tedious. But once we integrate it into our frontend app, we’ll be able to use something like AWS Amplify to handle these steps for us.
Making changes
Let’s make a quick change to our private route and print out the caller’s user id.
Replace packages/functions/src/private.ts with the following.
import { APIGatewayProxyHandlerV2 } from "aws-lambda";

export const main: APIGatewayProxyHandlerV2 = async (event) => {
  return {
    statusCode: 200,
    body: `Hello ${event.requestContext.authorizer.iam.cognitoIdentity.identityId}!`,
  };
};
We are getting the user id from the event object.
If you head back to Insomnia and hit the /private endpoint again.
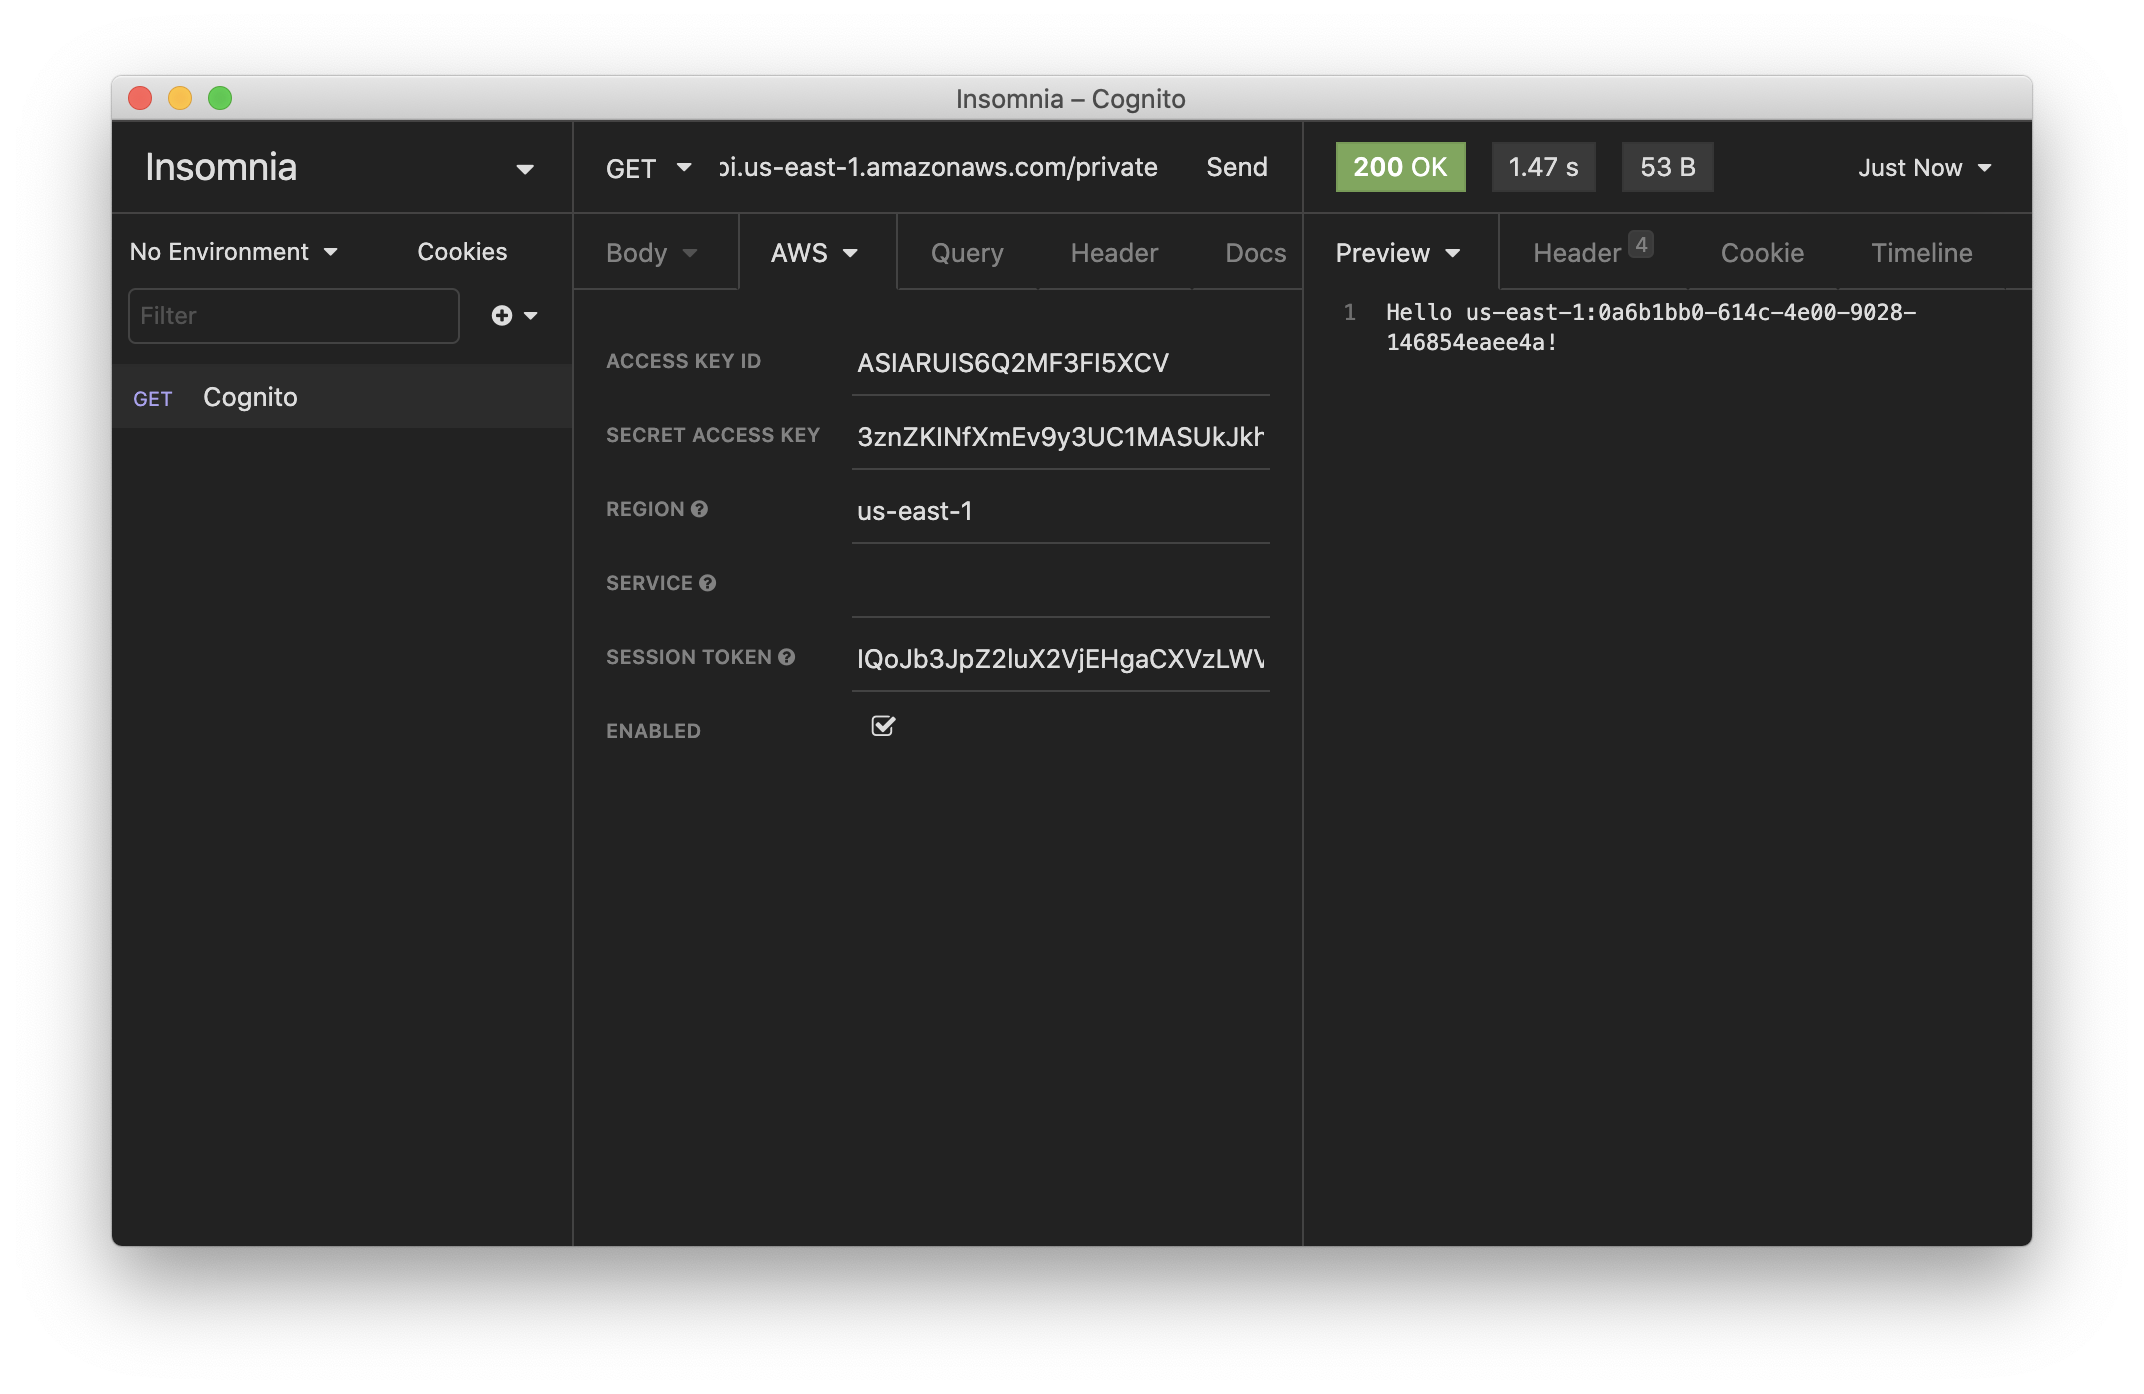
You should see the user id. Note, this matches the identity id that was generated from the step where we generated a set of IAM credentials.
Hello us-east-1:46625265-9c97-420f-a826-15dbc812a008!
Deploying your API
Now that our API is tested and ready to go. Let’s go ahead and deploy it for our users. You’ll recall that we were using a dev environment, the one specified in your json.
However, we are going to deploy your API again. But to a different environment, called prod. This allows us to separate our environments, so when we are working in dev, it doesn’t break the API for our users.
Run the following in your terminal.
$ npx sst deploy --stage prod
A note on these environments. SST is simply deploying the same app twice using two different stage names. It prefixes the resources with the stage names to ensure that they don’t thrash.
Cleaning up
Finally, you can remove the resources created in this example using the following command.
$ npx sst remove
And to remove the prod environment.
$ npx sst remove --stage prod
Conclusion
And that’s it! You’ve got a brand new serverless API authenticated with Twitter. A local development environment, to test and make changes. And it’s deployed to production as well, so you can share it with your users. Check out the repo below for the code we used in this example. And leave a comment if you have any questions!
Example repo for reference
github.com/sst/sst/tree/master/examples/api-auth-twitterFor help and discussion
Comments on this exampleMore Examples
APIs
-
REST API
Building a simple REST API.
-
WebSocket API
Building a simple WebSocket API.
-
Go REST API
Building a REST API with Golang.
-
Custom Domains
Using a custom domain in an API.
Web Apps
-
React.js
Full-stack React app with a serverless API.
-
Next.js
Full-stack Next.js app with DynamoDB.
-
Vue.js
Full-stack Vue.js app with a serverless API.
-
Svelte
Full-stack SvelteKit app with a serverless API.
-
Gatsby
Full-stack Gatsby app with a serverless API.
-
Angular
Full-stack Angular app with a serverless API.
Mobile Apps
GraphQL
Databases
-
DynamoDB
Using DynamoDB in a serverless API.
-
MongoDB Atlas
Using MongoDB Atlas in a serverless API.
-
PostgreSQL
Using PostgreSQL and Aurora in a serverless API.
-
CRUD DynamoDB
Building a CRUD API with DynamoDB.
-
PlanetScale
Using PlanetScale in a serverless API.
Authentication
Using SST Auth
-
Facebook Auth
Adding Facebook auth to a full-stack serverless app.
-
Google Auth
Adding Google auth to a full-stack serverless app.
Using Cognito Identity Pools
-
Cognito IAM
Authenticating with Cognito User Pool and Identity Pool.
-
Facebook Auth
Authenticating a serverless API with Facebook.
-
Auth0 IAM
Authenticating a serverless API with Auth0.
Using Cognito User Pools
-
Cognito JWT
Adding JWT authentication with Cognito.
-
Auth0 JWT
Adding JWT authentication with Auth0.
-
Google Auth
Authenticating a full-stack serverless app with Google.
-
GitHub Auth
Authenticating a full-stack serverless app with GitHub.
-
Facebook Auth
Authenticating a full-stack serverless app with Facebook.
Async Tasks
-
Cron
A simple serverless Cron job.
-
Queues
A simple queue system with SQS.
-
Pub/Sub
A simple pub/sub system with SNS.
-
Resize Images
Automatically resize images uploaded to S3.
-
Kinesis data streams
A simple Kinesis Data Stream system.
-
EventBus
A simple EventBridge system with EventBus.
Editors
-
Debug With VS Code
Using VS Code to debug serverless apps.
-
Debug With WebStorm
Using WebStorm to debug serverless apps.
-
Debug With IntelliJ
Using IntelliJ IDEA to debug serverless apps.
Monitoring
Miscellaneous
-
Lambda Layers
Using the @sparticuz/chromium layer to take screenshots.
-
Middy Validator
Use Middy to validate API request and responses.